Taking photos to accompany an article you’ve written may seem easy at first. If your article is about, say, the five best ethnic markets in Amsterdam, you go out and take pictures of the five markets.
But here is where it gets tricky. Should you take wide-angle pictures of each market? Should you focus on colorful produce shots? How about taking pictures of vendors interacting with buyers? What pictures should you take?!
The short answer is “All of them.” The idea is to take a wide variety of pictures of each subject, so that when it’s time to submit a selection to a magazine, you’ll be able to offer the editor some options.
Not only are editors looking for good pictures to illustrate your article, they also have to consider the physical layout of the story and whether pictures have enough empty space to overlay words onto the images. And ultimately, they have to select pictures that as a whole tell a story. So for your ethnic markets story, you would take pictures of the entire market from the outside and the inside, of people, of produce, of individual vendors, interesting signs, etc.—and each of these in a variety of ways.
Here are some non-technical suggestions that will provide a framework for your shoot:
1. Take small, medium, and large pictures.
The “small” picture would be something like a detail or a close-up. The “large” is what we call an establishing shot, or a picture that shows the subject in context. And the “medium” is something in between.
Each of these sizes is relative to your subject. For example, the establishing shot for a story about a restaurant might be taken from outside, in the context of the street where it’s located. The establishing shot for a story about New York City would be its skyline.
Keep in mind, however, that designating an image as small, medium, or large, is not as important as taking a variety of pictures of the same subject.
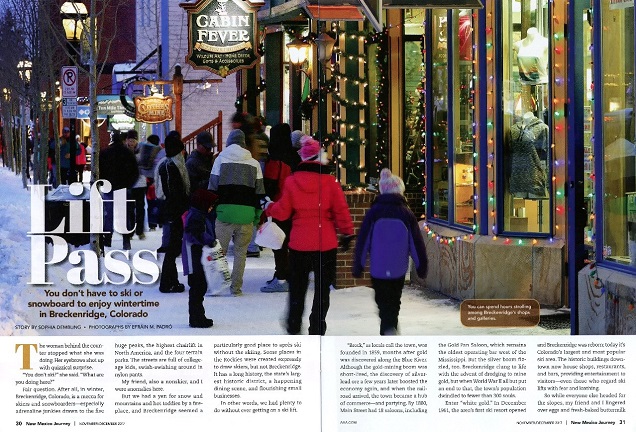
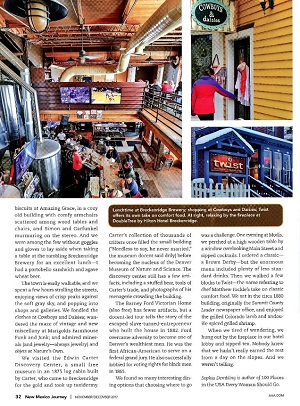
I recently took photographs for a story about visiting Breckenridge, Colorado in winter. I didn’t write the article, but the images selected for publication illustrate my point…
Note that the opening pages depict people strolling in front of some of the shops in town. It gives the viewer a sense of place. The rest of the article was illustrated with an interior shot of a restaurant, a photograph of a woman about to enter one of the shops, and a shot of the sign for a restaurant mentioned in the story.
2. Take vertical and horizontal (and askew) pictures.
Although most subjects look better in either a horizontal (also called “landscape”) or vertical (also called “portrait”) mode, you should always take both. It’s easy to do, and it forces you to look at a subject in a different way. Some subjects also look good in both configurations.
Once in a while, especially when you want to portray a subject in a particularly dynamic way, you can photograph it askew (crooked) on purpose. If you do this, make sure the effect is obvious; otherwise, it looks like a mistake.
Subjects that look good askew include sports, dancers, markets, concerts, and sometimes even architecture—in short, anything you want to make a little different or more dynamic.
3. Take pictures with empty space.
As I mentioned above, editors often use empty space to add words. The classic example is a cover shot depicting the subject in the bottom and the publication’s title at the top. But anything with empty space is fair game for an editor, so make sure some of your images depict your subject with empty space around it.