What you need to know about image quality:
Last week, I shared a video going over reasons why your photos might be getting rejected from stock agencies. If you missed it, you can watch it here.
Since image quality is one of the most common problems, let’s go over some tips for getting the most out of your camera.
But wait, what does “image quality” mean, anyway?
When we say “image quality” in stock, it usually refers to whether the photo has visible compression, which shows up as a weird, “digital” texture in your image, like this:

See how that even, green area is blocky instead of smooth? That’s a severe case of compression.
Compression happens in three main ways:
1. You have a smaller or older image sensor in your camera (or phone).
The larger and newer the image sensor, the more high-quality your images will be. Typically, newer mirrorless cameras and SLR cameras have GREAT image quality. Phone images almost always have some compression.
2. Your camera is set to shoot at a lower size or quality. Some cameras come from the factory set to a lower quality setting, so you can fit more images on your memory card. Even with new, high-quality cameras, if they’re set to shoot on a lower setting, you’ll get lower-quality images. ALWAYS shoot on the highest size and quality settings. See your manual to find out where to check in your camera menus. (If you’re shooting in RAW, you’re already set to the highest quality.)
3. Somehow, you’re reducing the quality in processing. When you export your photos out of Lightroom, or whatever image editing program you use, make sure it’s set to export at 100% quality. Also, processing your images to the max will create compression issues. Go easy on the sliders whenever you can.
Here are a few more things to keep in mind:
1.) Are you raising your ISO when you need to? When it’s bright out, use a low ISO, around 100-200, to avoid excess noise. But when it’s darker (or even cloudy) you need to raise your ISO accordingly. Some noise in images is better than having to brighten them in processing — which can worsen noise and create compression.
2.) Are you submitting the largest file size possible? For the most part, you should be submitting full size images to your stock agencies. (More on this topic coming up in a couple of weeks.)
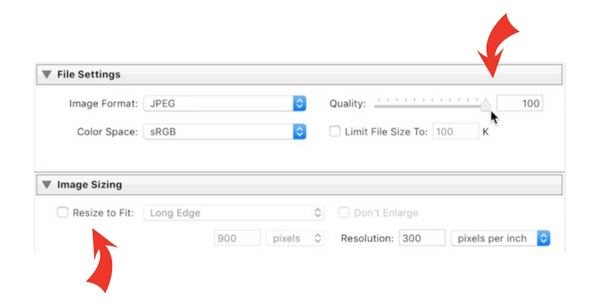
If you’re using Adobe Lightroom to export edited photos, be sure that the JPEG Quality slider is set to 100, and be sure that “Resize to Fit” is unchecked.
3.) Are you getting your exposure and focus correct in your camera?
This is a big one. It’s always best to make sure your subject is correctly exposed and in sharp focus while you’re taking the photo. Check your images in the back of your camera as you shoot. Trying to fix these issues in post processing could end up degrading image quality, so the best bet is to get it right while you’re taking the shot!
And last but not least… be sure to look over your image at 100% magnification in your computer to catch potential issues before you submit to your stock photo agencies.